Easy DIY Storage Bin Organizer Cabinet, for Newbies!
Easy DIY Storage Bin Organizer Cabinet, for Newbies!
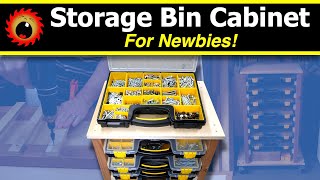 Simple steps for building a cabinet for Harbor Freight Storage Bin Cases, either rolling or stationary.
Videos mentioned in this video:
Build this Revolutionary Cross Cut Sled: https://youtu.be/cQINXsn2QBk
Easy Push Block for Table Saw Newbies: https://youtu.be/sei4CwkP3kQ
Project page: https://TheNewbieWoodworker.com/storage-bin-cabinet/
All Products featured in my videos: https://thenewbiewoodworker.com/products/
Products featured in this video:
Storage Bin Case (Harbor Freight): https://www.harborfreight.com/20-bin-medium-portable-parts-storage-case-93928.html
Caster Wheels – 2 Fixed, 2 Swivel – 3”: https://amzn.to/3lYuvEu
Fence Clamps (Milescraft): https://amzn.to/2W3qp3D
Remote Control Outlet Switch (DEWENWILS): https://amzn.to/2VSxsfj
Push Stick – Offset (Bench Dog): https://amzn.to/3mTKYLC
Measuring Tape – Lefty/Righty (FastCap): https://amzn.to/36IAZ3b
Drill and Circular Saw 3-Piece Kit (Makita): https://amzn.to/2RT27rm
Clamp – 12” (Jorgensen): https://amzn.to/31iI4Vl
Drill Bit Set – Countersink (DEWALT): https://amzn.to/2D0mw5b
Screws – GRK – #8 x 1 1/2”: https://amzn.to/2VrJBpX
Screws – SPAX – #8 x 1 1/2”: https://www.homedepot.com/p/SPAX-8-x-1-1-2-in-T-Star-Plus-Drive-Flat-Head-Partial-Thread-Yellow-Zinc-Coated-Multi-Material-Screw-197-per-Box-4191020400406/202040968
Center Hole Punch: https://amzn.to/2xAhla6
This guy so funny! Like it!
Great video. Just a suggestion… some melamine tape on top of those rails makes the bins glide much smoother. Thanks
Great Video,I’m in the UK and I’m trying to learn woodworking! I also do a lot with cars so this cabinet will be great for organising bolts/nuts etc
Nice this was the first video that showed once I searched! Great idea and design. If you want you can add sides to keep out dust. I might build mine the way you did and add sides if needed.
OMG! The tips regarding kickback & how to avoid it for cross cuts was amazing for this newbie! Thanks!
Awesomeness
This has moved up to my top 10 project list.
Always like your videos, Dan.
This is great, I use the same bins for my leatherworking hardware and need a way to organize them.
I was looking for tips to build something loke this. Thanks for sharing. Is there a special reason for the spacing between the rails. It looks like they could easily be closer?
Glad you’re back
Seems like a lot of wasted space between each storage box…almost enough for twice as many boxes.
Another great idea!
I have watched this twice now. Worth it both times. The great thing about this is that it is basic in nature. One can then customize it at will. For instance, sides to hang tools on, or put french cleats on. A back to stiffen the case up if necessary. I used to glue everything, but I am finding out that good screws are enough to hold most things together. Commercial kitchen cabinets don’t use glue and they last for years. Thanks for a great video.
Excellent! You saved me time and money!
Nicely done. I built a similar rolling cabinet at my last house. I used a lot more wood as you mentioned. It is at a new home now and the new owner is very happy to have the storage. Btw I used 0.5 inch plywood and it worked well, more than strong enough with a double thick base.
I came across your channel this morning! You are an excellent teacher! You explain things as you go and don’t act like you know everything. I have some new projects on my list now. I love your humor. Keep up the great content!
This is a really good concept. I often think of using metal in a similar fashion. Thanks. Jim
❤Nice video thanks for sharing God bless you and yours.
Fixing to build one and came across your video. Thank You. You just save me some money on plywood and in my house I get tired of begging.
Beauty is in the eyes of the beholder and i think it is beautiful in its simplicity. Furthermore it does the job it was intended to do and I like the openness of this design.
I love those HF cases. I don’t believe any other brand offers the same interchangability. I have emptied my wall hanging bins (like yours) into 4 cases so far. Now my wall is cleared to add some french cleats. My plan is to add some storage for the cases under my workbench (whenever I get around to making it).
I love all your videos. You have such a great presence and are so positive all the time. And you’re very clear about what you’re doing. Thank you from a true newbie.
Nice job
Thank you for the video and positivity.
Nice idea. Thanks for sharing
Great video Dan, thanks. I appreciate the detail you provide. I do have a question. What reason caused you to space the bins so far apart? Thanks again!
Great video kind sir.. exactly the basic type of project I was looking for. 😎🙏🏼
Your old organizer looks a lot like mine. I’d say 75% of my organizer is random screws/bolts/nuts I’ve collected over the years from random tasks and leftovers. They aren’t organized too well, but darn it if I don’t have some project come along where the perfect screw/bolt is right there waiting patiently for years for it to fulfill its duty. "My time has come".
Label or organizing your boxes?
Nice build. This style is on my todo list. You could come back and build shelves on each side to hold spray paint cans or long clamps.
Thanks very much for labeling with metric measures. 👍
Nicely done, sir! I have been watching many videos of this type of small parts container rack builds, and this is the most efficient build I have seen. I kike that it can be blown out when dusty, and that it has a backstop for the containers. I will be building this soon! I may tighten up the vertical spacing and keeping the base only as wide as the tower though. My olan is to make it a suitable height for a bench drill press on top. Again, thank you for the inspiration and tips!
Thanks for the non woodworking tip of standardizing on bolt sizes (1/4"). Great little nugget. Also – great simple project and video to go with it. Helps me remember we don’t need to over complicate things for shop projects. And I like the idea of the HF cases. I didn’t know they existed. Now I’m looking forward to getting all of my nuts and bolts etc out of recycled peanut butter and spaghetti sauce jars!
Awesome job. That’s a great relief from using plywood for the sides and back, especially if you don’t have a table saw. Thanks
Nicely done video!
This is exactly what I wanted to build next. I’ve been using those ULINE bins, until I filled them all up. Then I bought dividers, which worked for awhile, even though they never stayed in place. But now those are all full too. I’m gonna start moving away from Phillips screws soon so I knew I needed a different storage solution. Your video not only gave me some good info about building this kind of cabinet, but also some great info on the storage bins themselves. You saved me a ton of money. I had no idea Harbor Freight had these! I was about to drop $40 per for big-name storage boxes. Thank you!
Congrats on getting over 100,000 subs. Always enjoyyour videos an thanks for sharing.
I like the idea of the outfeed height. Makes rack more useful. Also double the bottom plate and put the wheels under your uprights, over time the bottom will start to sag as you put more weight on it. Use lag screws and this will support significantly more weight. Since you did not glue this, you can easily take it apart, move the tray rails closer together and get about 3 more cases in it for the same height, or shorten it for the outfeed option, still having the "Junk" shelf on the bottom. I love the idea of standardizing the 1/4 tray. I might add a 3/16 also, for the times you just need something smaller. I could also see a nail tray, or trays (maybe even a different rack altogether) with different sizes nails in each drawer, ie 16 penny different lengths one drawer, finishing nails another etc.
Nice quick project. Possible improvement: Instead of strips across the back you could have used a single sheet (or several scrap pieces) of 1/4" plywood. Not only is this less work, but also provides rigidity against sideways sheer forces. And it makes the total depth 1/2" less, which may be more friendly to your appliance door.
Really neat and simple idea!
Thinner rails, packed like sardines. Perfect-O
finished one of these recently — https://imgur.com/Yklwb0n
added some pulls on both sides and mounted my miter saw to the top, and reserved some of the excess width on the bottom to store a sawzall. getting the spacing right for the bins was a challenge with only 2 clamps (i’ve since leared the lesson and picked up a few more).
thanks for sharing this design! very pleased with how it came together, and (as long as you have all the clamps you need) quite easy to tweak and construct. now i’d like to make another one for the clamps i’m slowly amassing…
Cool . Use thoes cases a lot. Suggest using a brother label maker. So you dont have to remember what size a nut is or screw etc. You can just say ok i need a 1/4-20 bolt and a nut or. A finish nail etc. My wife always says….. parts are parts. But there organized.
Thanks
I have been looking at several plans for this and I like yours as it allows me to build it was some scrap wood I have laying around and not have to go out and purchase a bunch of $$$ wood. Thanks
Very nice 👍🏻
Thanks! I am making one of these today!
Cool, thanks for the inspiration. I think, I‘m going to build one or even two of these and add some ball rollers in the top plate to use it as an outfeed/support table for the table saw. Only thing I noticed, you seem to have „wasted“ quite a bit of space. Looks like there would have been room for at least one more case.
Always enjoy your vids, especially as a ‘constant newbie WW’ myself. LOVE your simple, concise directions and functional project…especially as my shop is always going through evolutions.